

TMS CPU Instructions - Canada
For all scheduling and rescheduling, please visit the online TMS at
https://na-app.tms.e2open.com/
Click here to jump to the tutorial section list.
We now have a step-by-step instructional video for 3rd party users showing how to register, request access, log-in, and schedule in the TMS at https://youtu.be/IVe0XtRRgvY.
As a reminder, below is key information related to 3rd party dock scheduling:
- All CPU carriers must register in the TMS to schedule. Steps to register and schedule are below.
- As in the past, all ASR shipping locations require appointments. There are no exceptions. Individual shipping location policies can be found on the following websites:
- Redpath:
- Offsite Warehouses (3PLs):
- ASR is providing a single point of contact to trouble shoot appointment scheduling issues. Use the email contacts below (Monitored M-F 8am-5pm Est): RedpathCPU@asr-group.com
- TMS instructions are accessible at the following link: /TMS-Instructions.
Please direct any questions or concerns that you may have to your sales representative or customer service representative. We thank you for your support!
Tutorial: ASR 3rd Party Scheduler within the TMS
(click a link below to jump to that section)
- Video Tutorial
- New Users to the TMS: Third Party Registration
- Existing TMS Users: Get Third Party Access
- Request Access to the ASR Account
- Set Advisors to Receive Email Notifications
- How to Appoint a Single-Order Load in the 3rd Party Portal
- How to Consolidate and Appoint a Multi-Order Load in the 3rd Party Portal
- How to Change the Grouping of a Consolidated Load in the 3rd Party Portal
- How to Change an Appointment in the 3rd Party Portal
- Scheduling LTL Pick Up Appointments in the TMS 3rd Party Portal
Watch our step-by-step instructional video or follow the written instructions below.
*Note: some graphics/images in the video may look different from the latest version of the TMS. Steps shown are within the USA scheduler, the CA scheduler has some differences. All written steps below are specific to the CA scheduler.
New Users: Third Party Registration
If you are a current e2open 3rd party user, skip down to the Request Access section. If you are a current e2open user and need 3rd Party access, instructions are below this section.
- To register, go to https://na-app.tms.e2open.com/
Click Third Party Registration at the bottom of the screen.
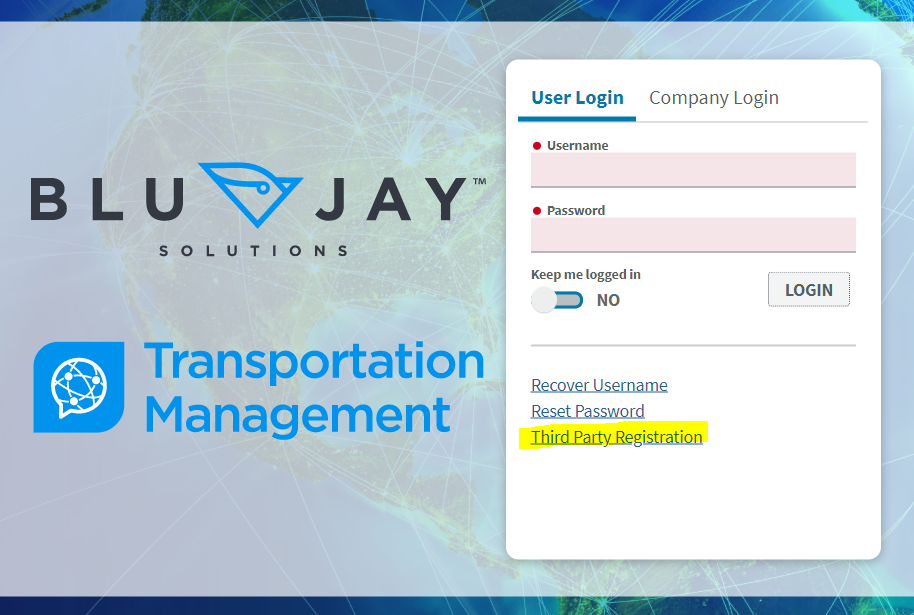
- Enter basic user information. Be sure to enter information in all fields marked with an Asterisk*.
- Crate a UNIQUE username. The username MUST BE unique among ALL TMS users, not just those associated with the your company. We VERIFY your email address is correct. If the email has a typo and bounces, the TMS can not send the activation link to you.
- Enter third party company information such as company name and contact information.
- Check the Validation box (I am not a robot).
- Review and accept the Terms of Service and click Save.
- If all fields are valid, the TMS will notify the user that an email has been sent. This email will contain a link to activate your account and assign a password. ALL emails from the TMS come from noreply@tms.blujaysolutions.net. These emails are sent immediately. If you don't see an email, please search your Junk/Spam folders. If nothing is found, please go through the registration process again with a NEW user name and verify you are using a valid email address.
- Upon the first log in, the TMS will require you to accept the updated Privacy Policies. You must scroll to the bottom to be allowed to click ACCEPT.
- Next: Request access to the American Sugar Refining company scheduler (steps to follow).
Existing BluJay Users: Get Third Party Access:
In BluJay, find you user name at the top right of the screen. Click on the drop down arrow and then the 3RD Party link, and follow instructions following to request access. If you don't have this link, follow the steps below.
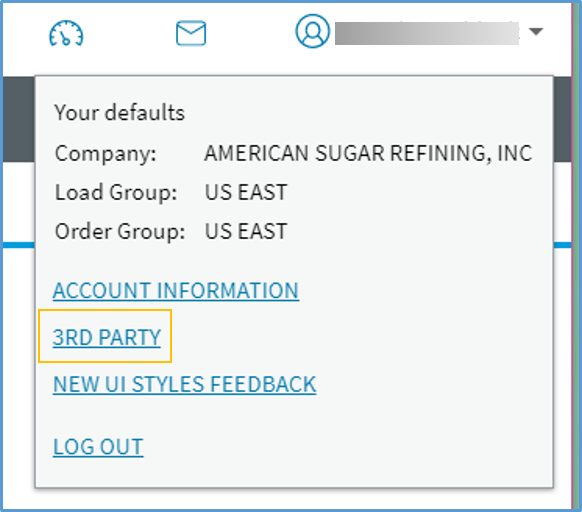
Enable Third Party User Access for Existing User:
1. Log in.
2. Click on your username in the upper right-hand corner of the web page and click on Account Information
3. Next to “Third Party Access” click the “Enable” link. *If you are not able to enable access, please email RedpathCPU@asr-group.com and provide your e2open username.
4. Log out of the website and then log back in for your account to properly update.
5. Click on your username in the upper right-hand corner of the web page and click on 3rd Party. Continue to the Request Access section of instructions
Request Access to the ASR Account:
Login to your 3rd Party e2open account (https://na-app.tms.e2open.com/). After login, Request Access with a shipper by selecting Request Access from the ACTIONS drop down (image A). IF you have access to other customers, you must click into one of these accounts for the ACTIONS drop down to show (image B). The user may associate themselves with many shippers through the same login and username.
A: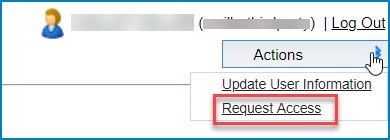
B: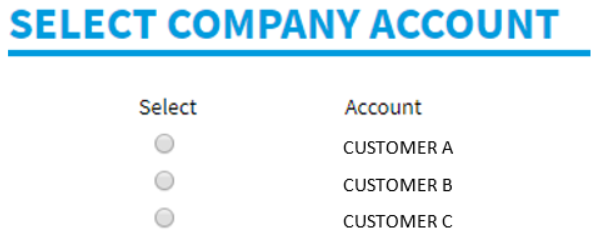
- In the Request Access window, for company SELECT “AMERICAN SUGAR REFINING, INC” and click SEARCH.
Select the regional ASR for the country in which you are scheduling. Answer the required question (list the customer(s) you are picking up for) and then click REQUEST ACCESS.
***IF the USA or CA region is not shown, log out of the TMS and back in. THis is a known glitch for existing TMS users enabling the 3rd Party scheduler for the first time. Your account will not properly update until you log out and back in.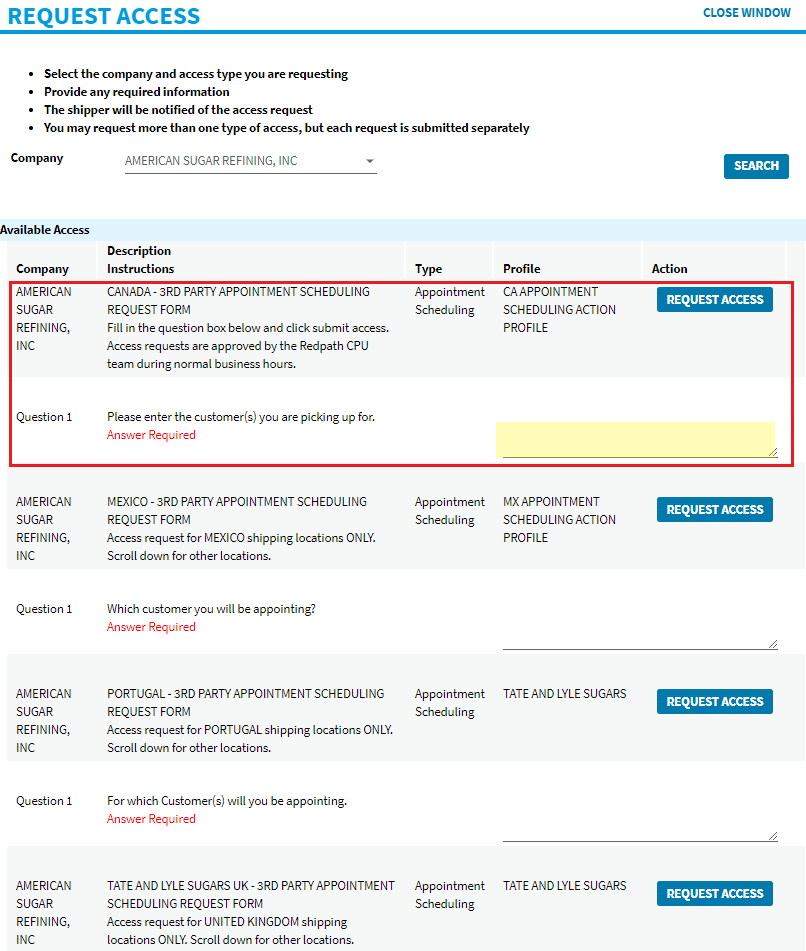
- Once submitted, the request will be sent to the ASR Logistics team for approval. Once approved you will receive an email from the TMS.
- Set up your Advisors before scheduling your first load (see following steps). This step is critical to ensure you receive email confirmations and change notifications for the loads you appoint.
Set Advisors to Receive Email Notifications:
Log into the ASR account on your 3rd Party Portal. Advisor settings are unique for each account. If you use the 3rd party scheduler for another customer, you must still set up advisors within the ASR account.
*NOTE: users will only receive email notifications for the loads appointed with their user account.
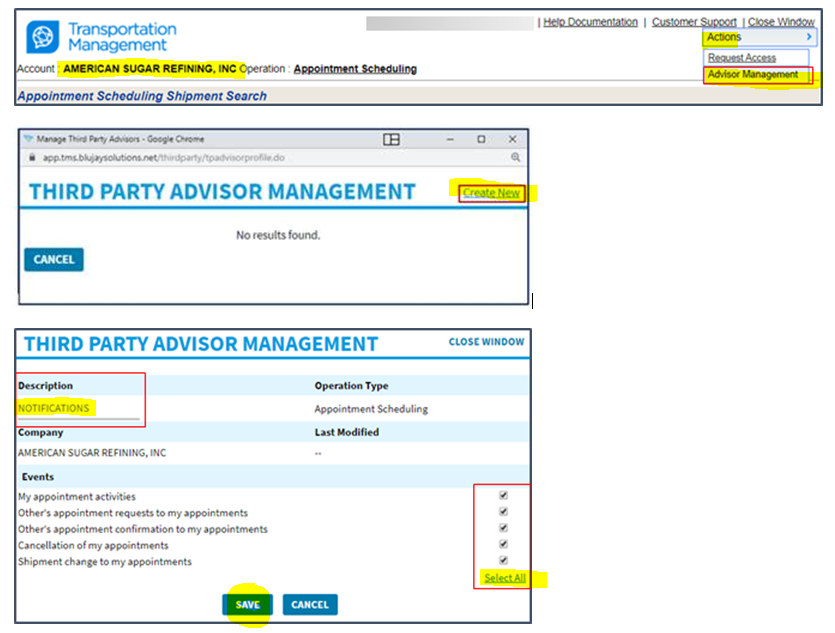
- Select Advisor Management from the Actions menu (top right of the scheduler).
- Click Create New.
- Enter a name for the Advisor profile and select the events that should trigger a notification. We recommend you SELECT ALL.
- Click Save.
How to Appoint a Single-Order Load in the 3rd Party Portal
(instructions for consolidated loads to follow)
- Open the the TMS site, and log in at https://na-app.tms.e2open.com/.
Select the American Sugar Refining, Inc account if you have multiple customers you service. Verify you are in the ASR account as shown below.
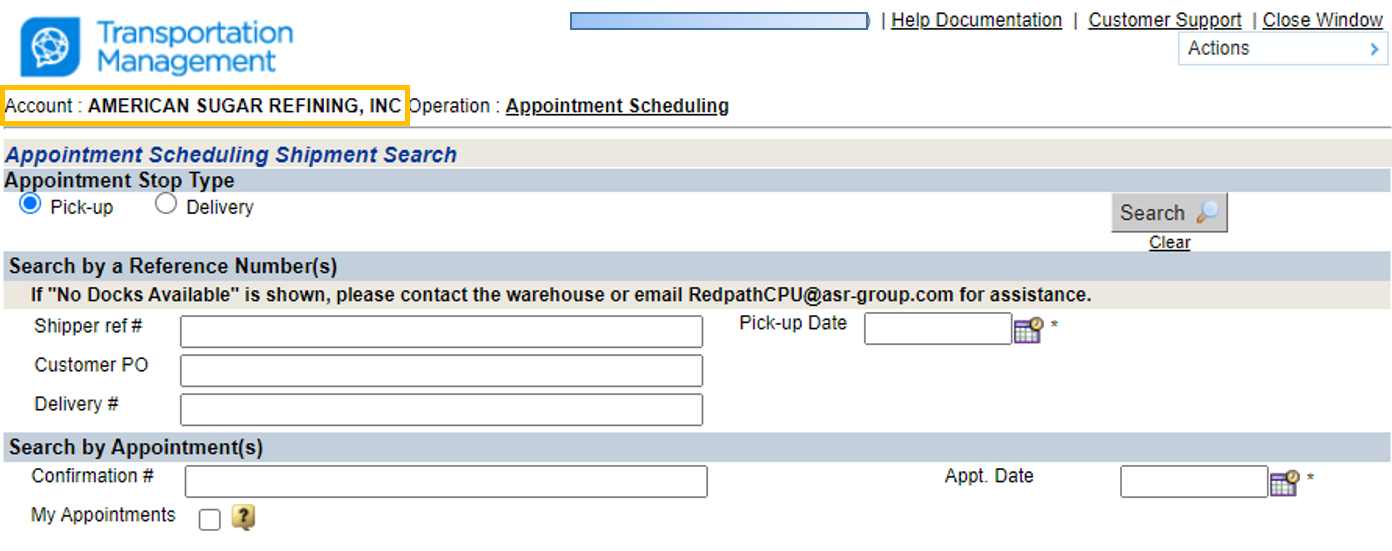
- Select Appointment Stop Type; Pick-up or Delivery.
- Enter a reference number into one of the three available fields. Click the Calendar icon and select the Pick-up Date for the load. Click “Search”. You may enter multiple reference number into a single field to search for multiple orders.
NOTE: Your sales order number (in the shipper ref # field) is always the best number to use. If using a PO and you don't find your order, try dropping any preceding zeros. - Check the box next to the order you wish to schedule and click "Appoint Scheduled as Live".
- Enter/Select the desired appointment date and click "Show Open Appointments". You may also click the "next day" link to the right to scroll through the days. If the desired day does NOT have any available appointments, you must go to the next day.
NOTE: CPU live loads should ALWAYS leave the carrier field blank. DO NOT enter data into this field unless you are scheduling a pre-load on your drop trailer. - Select your appointment time and click "Submit Request".
- To view your appointed load, click "Previous Shipment Search".
If you have any technical issues please email ASR at RedpathCPU@asr-group.com.
How to Consolidate and Appoint a Multi-Order Load in the 3rd Party Portal
NOTE: You may email ASRCPU to verify any order has been properly consolidated and scheduled.
- Open the the TMS site, and log in at https://na-app.tms.e2open.com/.
Select the CA APPOINTMENT SCHEDULING for American Sugar Refining, Inc. if you have multiple customers you service. Verify you are in the ASR account as shown below.

- Enter the reference numbers with a comma or space between them for the orders that need to be consolidated. A list of orders may be copy and pasted into the fields and the TMS will automatically put in the commas or spaces as needed. Click the Calendar icon and select the Pick-up Date for the load.
NOTE: Your sales order number (in the shipper ref # field) is always the best number to use. If using a PO and you don't find your order, try dropping any preceding zeros. Check the box next to the orders you wish to consolidate together and click "Consolidate Selected."
NOTE: If the orders were previously consolidate with no appointment, select "Manage Live Appointment" from the drop down and click GO (skip Next step and go to scheduling step).
- Specify the delivery sequence (fields at right) and click "Update Shipments and Manage Appointment."
NOTE: If you want to consolidate the orders and schedule at a later date you will click "Update Shipments." - Scroll to the bottom and verify the delivery sequence is as desired. Enter/Select the desired appointment date and click "Show Open Appointments". You may also click the "next day" link to the right to scroll through the days. If the desired day does NOT have any available appointments, you must go to the next day.
NOTE: CPU live loads should ALWAYS leave the carrier field blank. DO NOT enter data into this field unless you are scheduling a pre-load on your drop trailer. - Select your appointment time and click "Submit Request".
To view your appointed load, click "Previous Shipment Search".
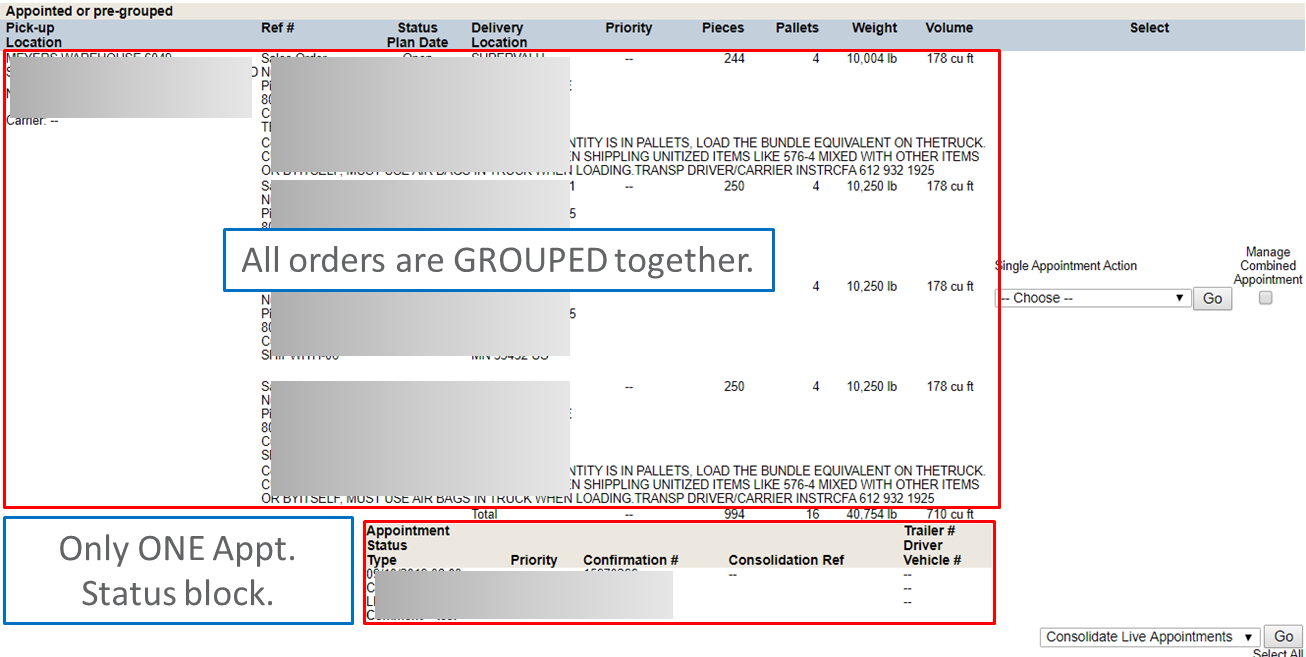
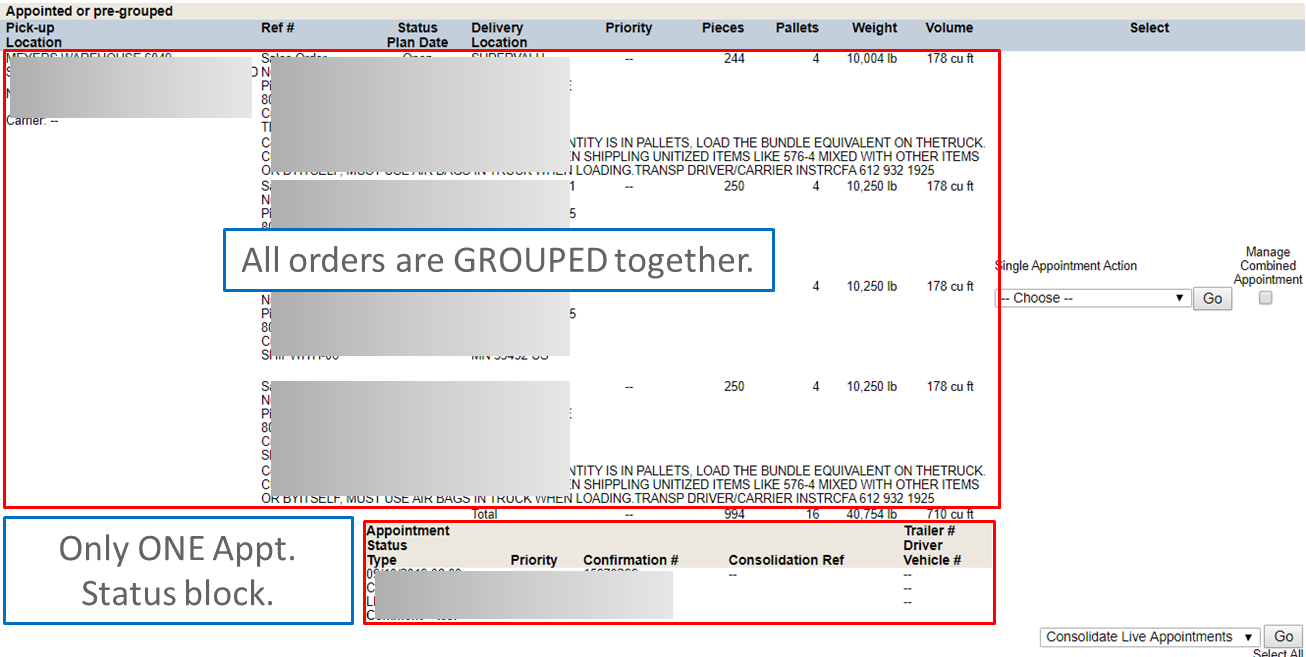
NOTE: If your loads are NOT grouped together like the example below, the orders are NOT set up properly to ride together. See steps below on how to change / correct consolidated loads.
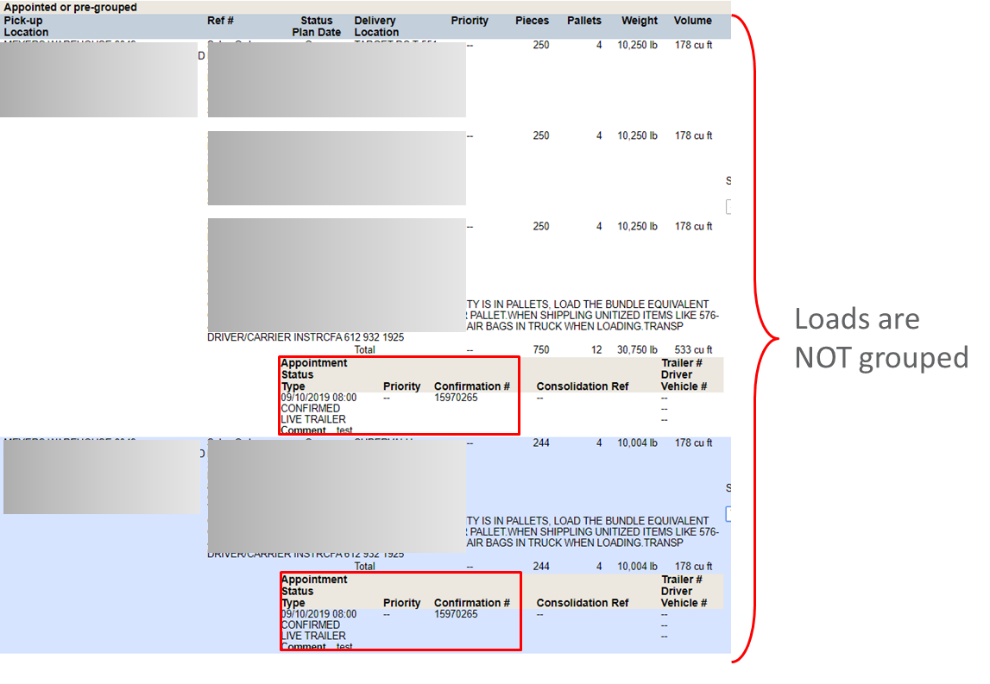
How to Change the Grouping of a Consolidated Load:
Below are three cases you may encounter where you need to updated or correct a consolidated load: add an order to a consolidated load, remove an order from a consolidated load, correct an improperly grouped load. If your update/correction does not fall into one of these groups, please contact us at RedpathCPU@asr-group.com.
****If you receive the following error when making changes to your load, exit out of the edit screen and email RedpathCPU@asr-group.com. Provide your reference number(s) and task you were attempting when the error occurred.
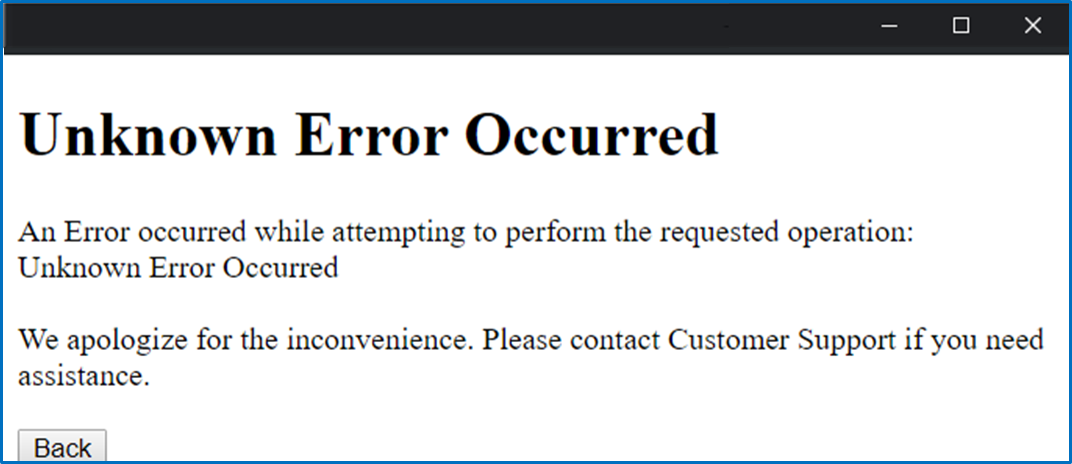
- Half of a Consolidated / Grouped Load Already Shipped
***Perform the following steps to remove the SHIPPED order from the group. If additional group changes are needed, perform those steps AFTER the shipped order is removed and the grouping is saved.- Enter the reference numbers of the orders that need correcting and click search.
Select "Manage Grouping" from the pull-down and click "Go."
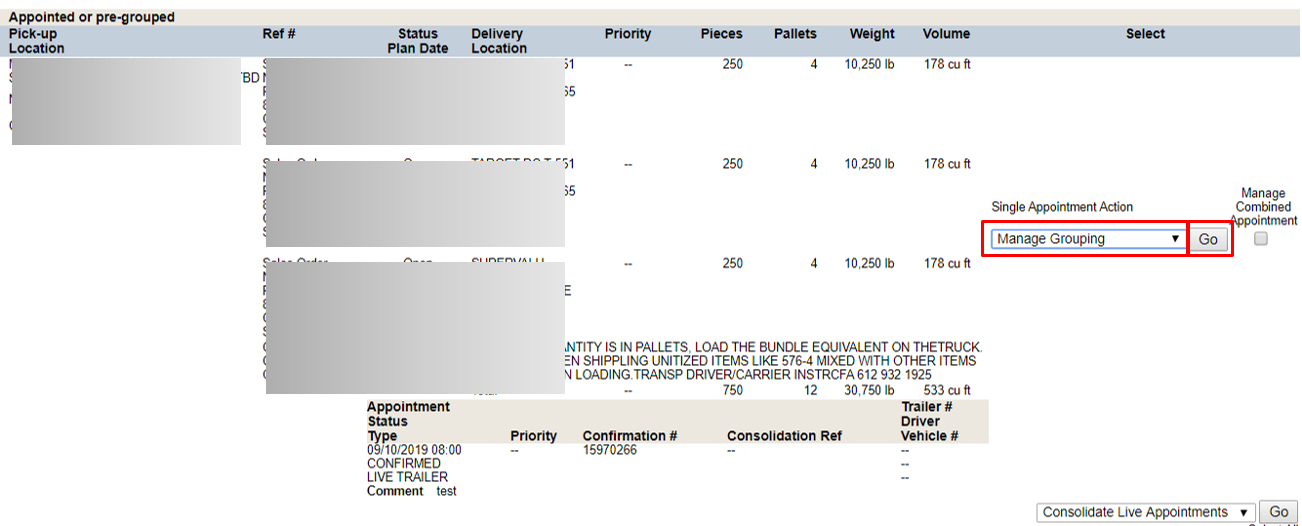
Un-check the box next to the order that SHIPPED, click "Update Shipments."
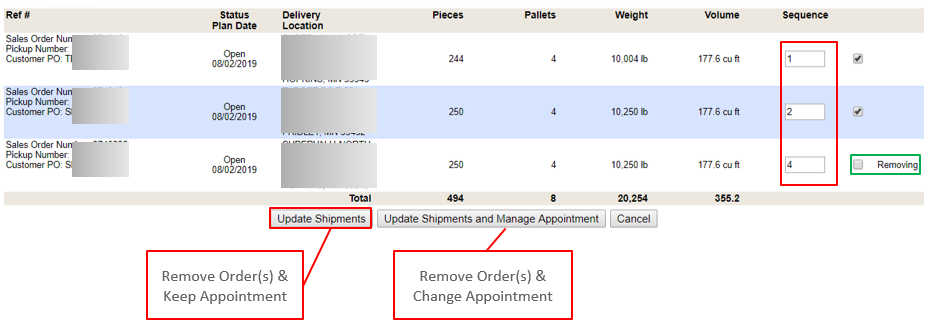
- Add order to consolidated load:
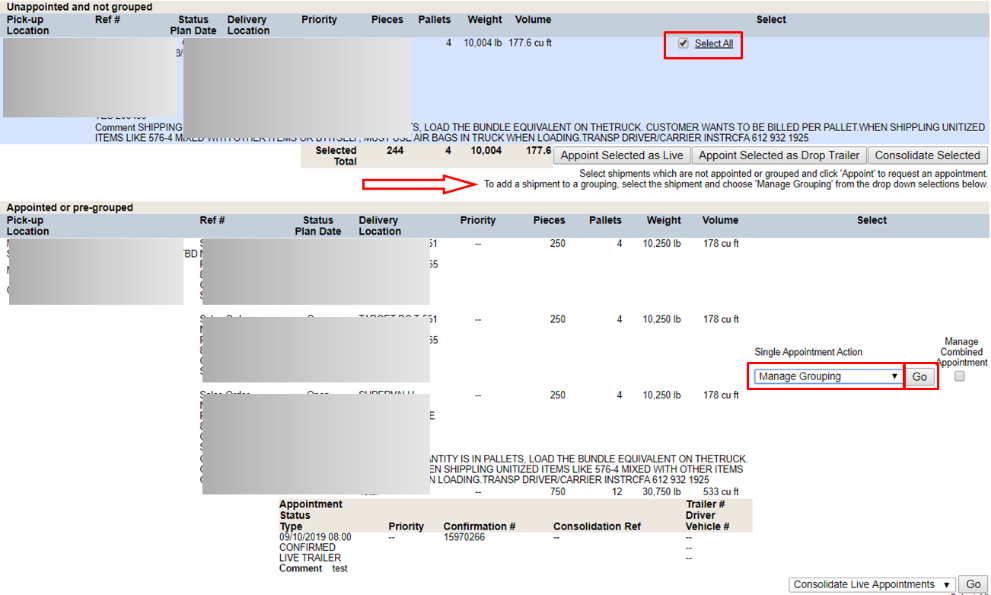
Select the order(s) that need to be added to the group. Select “Manage Grouping” on the consolidated load with the appointment and click “Go.”
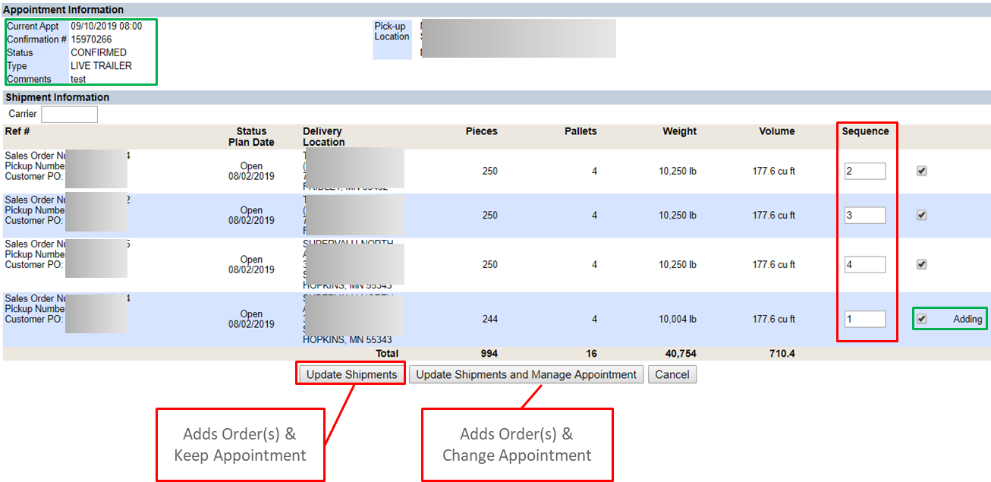
Update the delivery sequence as required and the click “Update Shipments” to keep the same appointment or the other button shown to change appointment.
Verify consolidated load is properly grouped:
- Remove order from a group:
Select "Manage Grouping" from the pull-down and click "Go."
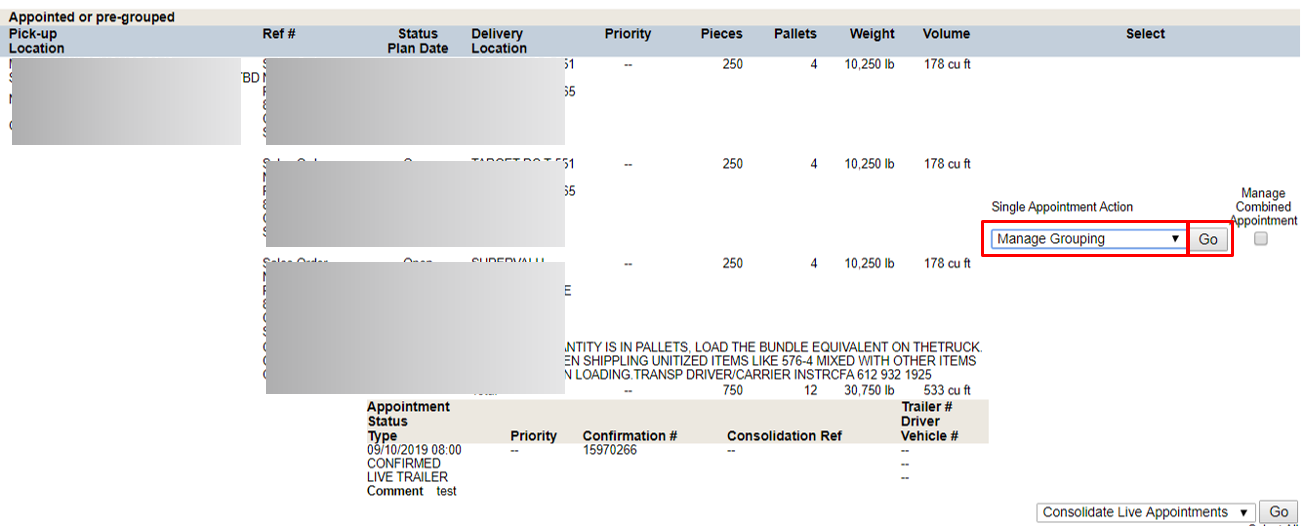
Un-check the box next to the order needing to be removed from the group, update the sequence as needed, and click "Update Shipments" or "Update Shipments and Manage Appointment."
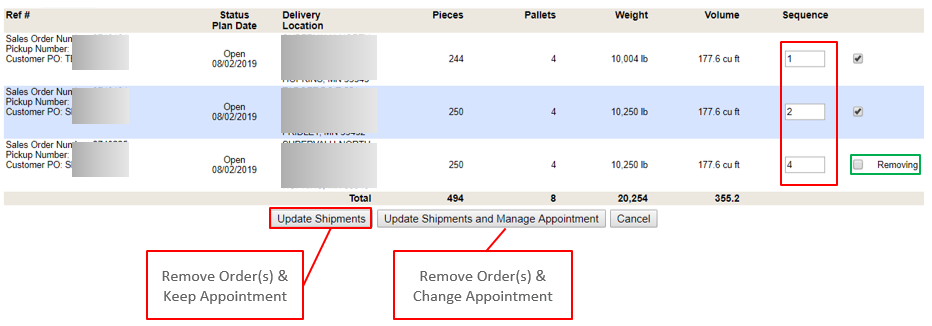
- Verify consolidated load is properly grouped.
Orders NOT properly grouped:
***NOTE if one or more orders in the group already shipped, Go to Step 1 first to remove them from the group. DO NOT void a consolidation if a shipped order is grouped in it.***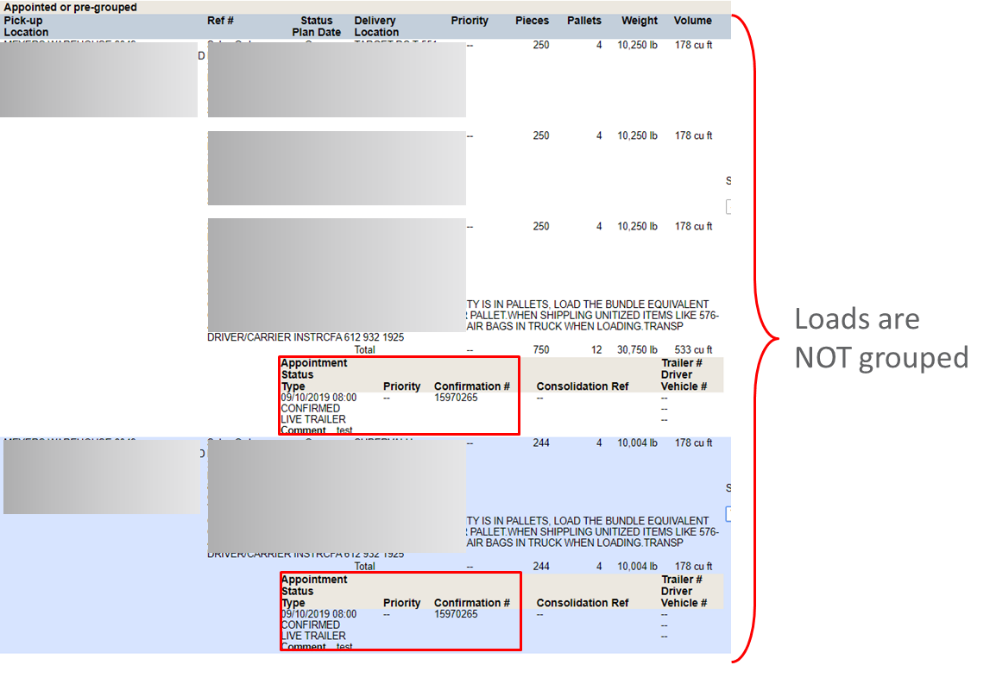
Void one of the order groups. This will NOT affect your appointment.
***DO NOT void a consolidation if a shipped order is grouped in it. See step 1 or 3 on how to remove an order from a group before performing the void task.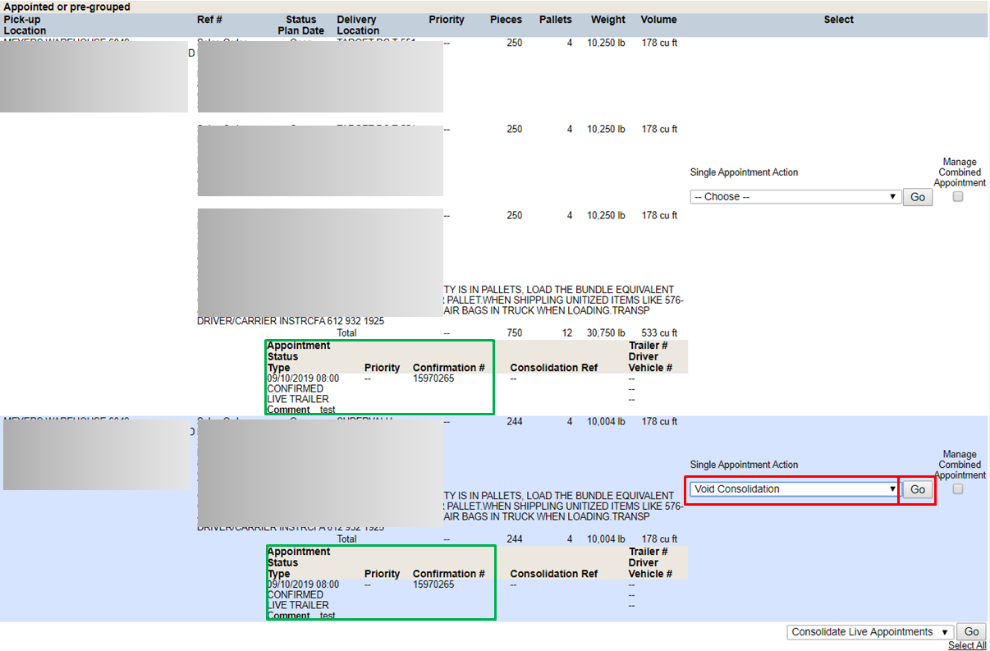
Select the order(s) that had the “Void Consolidation” function performed on the previous step. Select “Manage Grouping” on the order with the appointment and click “Go.”
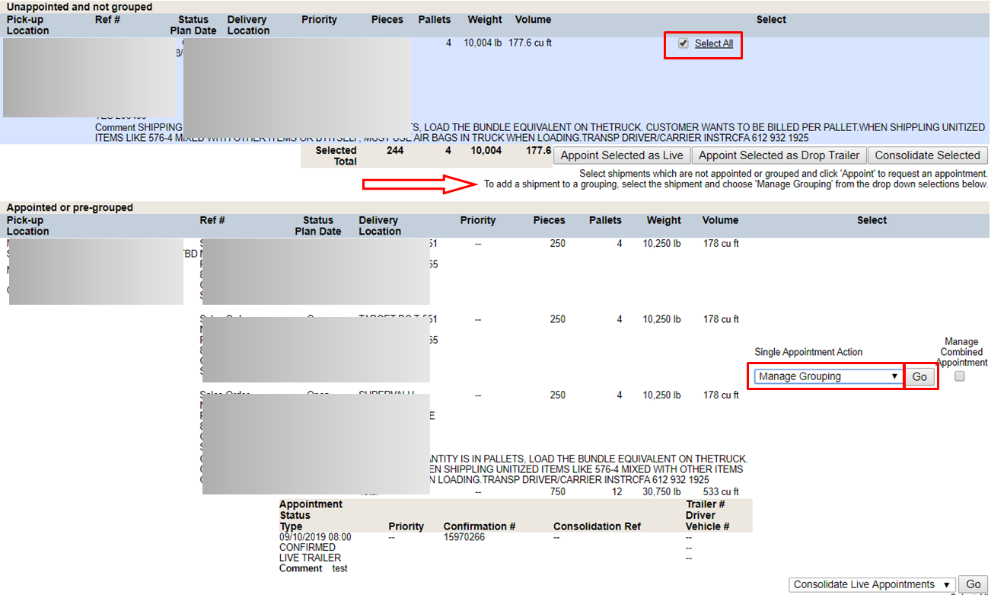
Update the delivery sequence as required and the click “Update Shipments” to keep the same appointment or the other button shown to change appointment.
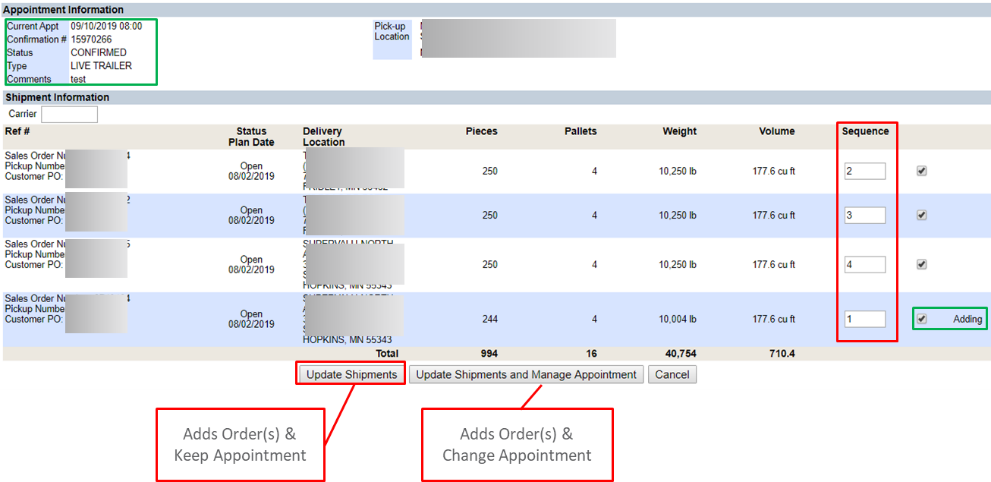
- Verify consolidated load is properly grouped.
How to Change an Appointment in the TMS:
NOTE: If a load needs to have consolidated orders broken apart, see the step above.
- Search for your order(s) just as you did to schedule.
- When the order displays at the bottom of the screen, select Manage Live Appointment from the drop down (highlighted in yellow) and click go.
- From here you can change the date/time based on the available appointment slots. Be sure to click "Show Open Appointments" or click the "Next Day" link to change the date. Once you change the appointment, the TMS will send out email notifications as specified on your account.
NOTE: If there are no available appointments on the day you need OR the pickup location does not allow for appointment changes in the TMS within the time frame you are requesting, you will see “No LIVE TRAILER appointments found for the day of XX/XX/XXXX.” Please select another day or contact the warehouse directly to be fit in if you see there are not days available (WHSE doesn't allow changes). Warehouse contacts their appointment policies may be found at the following links.
Warehouse contacts:
Redpath locations:
Offsite locations:

How to Schedule an LTL in the TMS
All ASR sites are aware that LTLs can't be held to a firm appointment time. However, we required the scheduler to be used so that our warehouses are aware the LTL is coming.
- Search for your order number as normal and follow the "How to Appoint a Single-Order Load" steps.
- When selecting the time, pick a late afternoon appointment and put "LTL" in the comments along with the carrier's name or SCAC code and estimated window for pickup (ex. LTL ACME Transport 14:00-18:00).
- Submit your appointment request.